I will post again next week with the new direction I think this blog should head towards. I look forward to sharing all of the amazing things I've tried and learned in the last year.
Saturday, July 4, 2015
Hello Again
Here I am again after anther long layoff. I haven't forgotten about my blog of good intentions. I was crossing my fingers that it had not been a full year since my last post and as it turns out it's been a year and a month. So, here I am saying hello again and happy 4th of July!
Wednesday, June 4, 2014
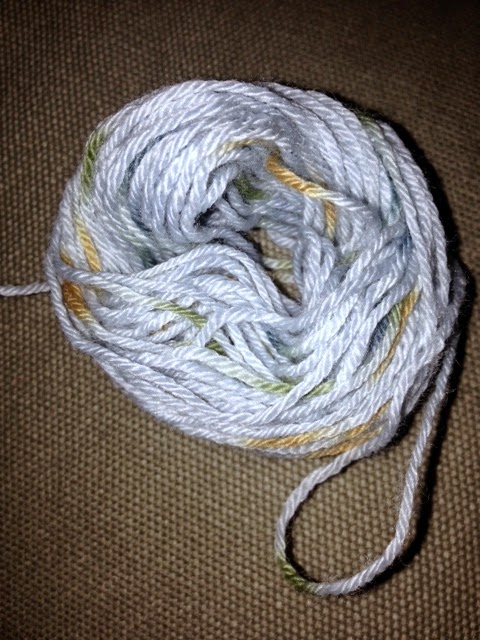
My Yarn Stash Gem
TSCArtyarns Zara Hand-Dyed
I mentioned before that I really don't
like to have a large yarn stash, but I was the grand prize winner and
an individual store winner of the Triangle Yarn Crawl, which made my
stash grow considerably. I only made one purchase during the yarn
crawl and that was for a gorgeous yarn that I had to buy even though
I did not have a project in mind. I purchased this yarn only for the
colors. I didn't know the fiber content or the yarn's weight. I
didn't even pay attention to the brand.
I used mostly acrylic yarn that I
purchased from chain craft stores before I did the yarn crawl. I have
since broadened my horizons and fallen in love with wool and wool
blends. One of the brands that I haven't purchased yet, but hope to
get my hands on, is Artarns. I really like their line of shiny beaded
and sequined yarn. But, that's for some time in the future.
I'm wrapping up several projects and
decided to check out this anonymous yarn that I purchased during the
yarn craw. It looked even more beautiful than I remembered and my
brain lit up with design ideas. I pulled the label from the center of
the ball and discovered it was TSCArtyarns Zara
Hand-Dyed, which is a joining of Tahki Stay Charles and
Artyarns. It turned out this whole time I had been window shopping
Artyarns, I already had some in my stash.
I was slightly disappointed that I
marked this yarn to make a gift for my mom. But, I enjoy working with
fine yarns even if the product will be given away. I investigated the
label and saw that it was “100% Extrafine Merino Wool”. I
haven't knit with luxurious merino yet and it will be nice to compare
some regular ol' merino that I have with this “extrafine.” I
still don't know exactly what I will make with this yarn, but it has
motivated me to finish up my projects.
I haven't posted for a while since I
have been obsessively spinning yarn and doing very little knitting. I
have been working on a post explaining how I do gauge swatches. I
will also have some spinning posts coming up soon.
Have you been lucky enough to find gems
in your yarn stash that you didn't realize were there?
Thursday, May 15, 2014
Drop Spindle Your Own Handspun Yarn
My drop spindle that is stained green from my green fiber.
I
was recently at the Carolina Fiber Fest and saw a booth with a few
spinning wheels and price tags that let me know it would be a while
before I could spin. I went to another booth to buy a book. In my
peripheral vision I saw a woman at the spinning booth using this
12-inch stick thing to spin yarn. Unfortunately, it was time for me
to leave and I didn't get to ask the woman what she was doing. I went
home and searched online for something like, “spin yarn by hand.”
I found dozens of videos for using the stick thing, which turned out
to be a drop spindle.
That one demonstration has become a
Pandora's Box for my fiber world. I watched every video I could find
of people using drop spindles. This was my alternative to an
expensive spinning wheel. I took a class for the drop
spindle just last weekend. I haven't had much practice since the
class, but I look forward to my next fiber purchase so that I can
spin, spin, spin!
I wanted to show my drop spindle in
case there are others interested in spinning yarn, but can't afford a
wheel. I have seen some basic, but high quality drop spindles on Etsy
for $10-$25 dollars. And then of course Etsy also has some gorgeous intricately designed spindles. A lot of yarn stores carry spindles and fiber and many spinning wheel manufactures make spindles. You can
learn a lot from watching the videos available online, but nothing
beats learning in person. I liked being able to ask questions and
receive corrections.
Your first yarn probably won't be
something that you can knit with, but you may be one of the lucky
ones who picks it up right away. A spindle is not as fast as a wheel,
but some use spindles exclusively. They are worth learning on because
of their portability. I will take mine to some spinning groups when I
get a little better.
My first 3-yard hank of handspun.
Do you already spindle or use a wheel?
Or, may spinning be in your future?
Wednesday, May 14, 2014
Knitting Gauge: A Mildly Essential Tool
I consider the knitting gauge “mildly essential” but, I want to be clear that I am NOT
saying that checking gauge is unimportant. Gauge is especially
important when it comes to garments, but I'll make a post about
checking gauge in the near future. I purchased one of those beginning
knitting kits when I first learned to knit and I think that it
came with a knitting gauge that I never used. It was
a long time before I knit anything where gauge really mattered. The
reason I say that a knitting gauge is mildly essential is that you
can use a standard ruler to check gauge.
The pictured gauge is from my Boye
set of interchangeable needles. The 2-inch vertical and horizontal
windows on the left edge are what I use to check the rows and stitches per inch, also
known as gauge. I use the needle gauge on a regular basis since sizes
aren't marked on my interchangeable set. It also has a 6-inch ruler
across the top for small measurements. Basically, I use this for a
lot more than checking gauge. You can buy these alone and they are
often packaged with kits. It's also worth looking into some unique and handcrafted gauges since it is a tool you can buy once and keep
forever.
Do you use a knitting gauge or ruler to check gauge?
Wednesday, May 7, 2014
Knitting Aid: Row Counter
One of the tools I am using while
knitting my socks is a row counter. After a decade of knitting I
finally decided to buy one. My original method for counting rows or
pattern repeats was tally marks. There is nothing wrong with saving
the money and using pen and paper. I decided to make the change now
because I have a toddler who likes to come and snatch things and its
easier to keep up with one row counter than a pen, paper, and
something to write on. I usually hide my row counter under my thigh
so that he doesn't see it.
Most row counters I see are similar to
the one I purchased, which is made by Clover. They count to 99 and then reset to 0.
I have seen a few that will count to 999 and have separate number
sections to count two things such as stitches, rows, or pattern
repeats. I have also seen a few apps that have customizable counters.
I also like the clicking sound they make. It is aural gratification
that makes me feel like I am making progress. That click means I have
just completed one more row, and then one more. It is much more
satisfying than tally marks.
The only drawback I have found is that
the top will sometimes get pressed if the row counter is bouncing
around in my project bag. Then I have to spend some time figuring out
which row I am on. This has happened a few times while working the
chart for the socks I am knitting. I make a mental note of my last
row at the end of my knitting sessions, but my brain sometimes fails
me.
Do you bother with a row counter or use
another method?
Monday, May 5, 2014
Unfinished Sock Woes
I wanted to share my UFO for this week. I am working on a pair of socks and I wanted to have
the first sock finished this weekend, which did not happen. One of my
knitting goals for 2014 was that every piece I knit have at least one
element that is new to me. These socks have multiple new elements and
they are driving me crazy.
It is my first time using fingering
weight yarn, size 1 needles, and legit stitch markers. It is also the
first pair of socks I have made and for some reason I decided to make
it even harder on myself and knit them using the standard continental
method instead of my usual combined method. In hindsight I think that
I would have enjoyed making a sock in a worsted weight sock yarn with
simple ribbing.
The sock pattern is called, “Elm”
from The Knitter's Book of Socks. I instantly fell in love with the
pattern and I rarely find a pattern that I want to follow to the
stitch. This may have actually been a first, but I fell in love with
the stitch pattern and not the overall sock design. I should have
considered that I don't like long socks. The more I get into
constructing this sock the less I think it is something I will wear
and that has hindered my motivation.
I still really like the stitch design.
It is basically a repetition of the 3 x 3 rib pattern used for the
cuff. As it moves towards the toe the ribbing shifts and appears to
crisscross in a beautiful way. I get a little fed up with the
constant decreases and increases, but the finished socks will be
beautiful. My only variation on the pattern is that I used Ty-Dy
Socks Dots by Knit One, Crochet Too instead of the pattern's specified yarn. I saw this at my local yarn
store and grabbed it on a thoughtful impulse. Its one of my favorite
sock yarns.
I'm giving myself another week to
finish the first sock and then I will work on another project before
I start the second one. I need to give my hands a break from the
small needles. Do you have any never-ending projects?
Thursday, May 1, 2014
Beginner Basics: Garter Stitch
I want to talk about what is usually
the first stitch pattern learned - garter stitch. My Psychology
teacher was not a knitting professional or even American, so
terminology was not emphasized. Some of the early patterns I worked
through would say something like, “work garter stitch until piece
measures four inches.” I would then look at one of those teach
yourself books to figure out what garter stitch is. Most newer
pasterns write out the stitch patterns in the general notes, but you
may run into “work garter stitch,” in older patterns.
What is Garter Stitch?
Garter stitch is simply performing a
knit stitch across the row on both the right side (front of the work)
and wrong side (back of the work) of the work. The first thing I knit
with my Psychology teacher was a garter stitch scarf. I cast on
around 45 stitches in a worsted weight yarn and knit every stitch of
every row until the scarf was approximately four feet long. I ended up
with a scarf that was too wide and too short. I never wore it, but I
still have it.
I was very anti-garter stitch after
making that scarf. I find garter stitch takes a bit more effort physically than
stockinette stitch and I think there is a mentality that its too
simple once you move on to more complex stitches. But, after knitting
for years I have fallen in love with the humble garter stitch. I
think that it is a beautiful stitch in all its simplicity. It also
works beautifully as an edging to prevent stockinette stitch from
curling. Many throws and baby blankets have garter stitch borders.
How to Count Rows
Garter stitch is also one of the
easiest stitches to count the rows. Each ridge of garter stitch is
made of two knitted rows. If a pattern calls for 15 rows of garter
stitch it is easy to count each of the ridges and multiply by 2.
That will give you the total number of rows that have been worked. It
is important to remember that the cast on row is never counted and
the stitches that are on the needle count as one row. Seven ridges,
plus the row of stitches that are on the needle would equal 15 rows
of garter stitch.
Below is a quickly and poorly knit two-color garter stitch sample. I started alternating white and blue
ridges (six rows) followed by two blue and two white ridges (eight
rows). Then, it is back to one ridge of each color. The cast on and
bind off rows aren't counted for a total of 18 rows.
Please ignore the uneven tension and unwoven ends :-)
Tuesday, April 29, 2014
Product Review: Creative Comfort ™ Crafter's Comfort Glove
I decided to try the Crafter's Comfort
Glove because I often suffer from swollen and stiff fingers after
long knitting sessions. The box says that they provide relief for
arthritis, swelling, pain and cold hands. I knew I had seen something
like this at my big box craft store and of course none of the
employees knew what I was talking about when I asked for their
specific location. I had to walk the sewing aisle several times
before I spotted them wedged in a tiny space that was surrounded by
large cutting mats. They come in sizes small, medium, and large and
have a guide on the box for choosing the correct size.
I first experimented using the gloves
with my fingering weight sock yarn and they were nearly impossible to
use. I found it very difficult to tension my yarn in my left hand. I
hold the yarn in my palm for tension and I could not close my hand
tightly enough to secure the yarn. It was more functional to wear one
on my right hand only, but my size 1 needle kept slipping out of my
hand when I tried to move into working position on the next
double-pointed needle. I will revisit these gloves when I am working
with larger needles and yarn.
One positive is that they make my hands
feel a lot better while typing. They restrict my finger movement
enough to add stability without losing speed and the open finger tips
prevent any clumsiness. There is noticeable compression around my
fingers and I think it will help with swelling. They are looser and
very comfortable through the palms and wrist.
What devices do you recommend for hand comfort?
Monday, April 28, 2014
Crocheting My Stash
Yes, this is still a knitting blog even
though I am talking about crochet. I am a terrible crocheter, but I
have always been attracted to granny squares. They have that classic
crochet appearance. People who are bold with color can make some
stunning pieces.
I decided to use my easy center-pull ball stash to practice making them. I can do crochet
stitches, but I have a hard time reading patterns and putting it all
together. I crocheted along with a YouTube video to make these
squares. Hopefully muscle memory will kick in soon. I don't love the
colors, but I have high hopes for the final motif.
This post isn't about crocheting. I
wanted to talk about some of my yarn stash habits. I don't like to
keep a large stash, which is probably different from the majority of
knitters. I rarely buy yarn just because it looks nice or because I may be able to make something beautiful with it. I like to
have a project in mind with every purchase. Sometimes I will create a
tiny stash because I buy yarn for a new project before I finish the
current one. This bad practice encourages unfinished objects. Try to avoid.
It's hard to avoid a small stash of
leftovers. I can't think of a time when I had a project that
magically used every inch of yarn. Some leftovers are perfect for
embroidery or other embellishments. I also use them to experiment with color and stitches before I am ready to do true swatching.
Do you like to keep a large stash? How
do you use your leftovers?
Saturday, April 26, 2014
Tangled Mess
Just when I said I have not had any
problems with tangled center-pull balls purchased from my local yarn store I end
up with this mess, but this ball was already wound. I had a few
close calls from the start. I would have to give a less than
gentle tug, but it continued to pull from the center in one beautiful
strand. My last major tug birthed a huge clump of yarn.
For most people this is a source of frustration, but I have to admit I was mildly excited. I enjoy
untangling things. Untangling my parents jewelry was a reward for me.
Fingering weight yarn did pose a bit of a challenge. I knit as much
of the slack as I could, but stopped when I noticed the yarn was
fraying. I had to cut twice and ended up with a little ball that
I wound around my fingers.
It was unfortunate that I had to break
the yarn in the middle of a sock – more ends to weave. It also
wasn't the best idea to break the yarn at the end of a double-pointed needle. I had a hard time maintaining tension on the
old and new yarn, which resulted in ladders for a few rounds. I still
love center-pull balls despite today's hiccup.
Friday, April 25, 2014
Cheap and Easy Center-Pull Balls
I think center-pull balls of yarn are the bee's knees. I like that i don't have to put down my knitting to unwind yards of yarn to avoid the ball bouncing around. I used to distrust center-pull balls because they tangled so often. I only recently started shopping at my local yarn store and haven't had any problems with the balls they wind for me.
I had some yarn left over from my latest project and the skein was in a tangled heap by the time I finished using it. I remembered that my Vogue Knitting Knitopedia has directions for making a center-pull ball using an empty toilet paper roll. It was a very simple process and went by faster than I expected. I still don't think I will use this method for large hanks of yarn, but it is perfect for leftovers that will go into my yarn stash.
I pulled apart the roll at its natural seam to secure
the yarn end pointing inside of the roll.
Then I wrapped the yarn around to form an X. I wrapped
several times to form the left diagonal then changed
directions to form the right diagonal.
My third small ball.
I did three progressively better balls, but forgot to insert label information before I removed the roll. The book suggests using a figure-eight, but I had trouble doing that method. I think that it will form a neater and more balanced ball. My real test will be if they all pull from the center without any snags.
Do you like to make your own center-pull balls? Have you tried using a ball winder or a nostepinne?
Thursday, April 24, 2014
Beginner Basics: Long-Tail Cast-On
The first cast-on method I learned was
long-tail, but I didn't learn the name of it until a few months ago
when I was looking for another cast on method. My Polish Psychology
teacher who taught me to knit just said, “Hold the yarn like this.
Do this.” That was my casting on lesson. But, there is a reason it
is usually the first cast-on method learned. It is extremely
versatile and works for most knitting patterns. It's also fast and
easy once you get the hang of it. It also gives you a row of knit
stitches. Purling the first row will have you in stockinette pattern,
but note that most patterns don't consider the cast on row as the
first row. I wanted to share a few things about long-tail cast-on
that I have picked up.
Estimate Tail Length
20 loops over 2 needles so that I could cast on 20 stitches.
The loops don't have to be neat and tidy.
For years I would
estimate tail length by pulling out yarn until I knew for sure I had
enough. I ended up wasting a lot of yarn that way. Eventually I
started to estimate half an inch for every stitch I cast on. This
method also resulted in tails that were too long and I didn't want to
pull out measuring tape with every new project. My new favorite
method of estimating tail length is by wrapping a loop around both
needles for every stitch that I need to cast on.
I am left with a tail long enough to weave in
after casting on 20 stitches.
First row of purl stitches establishes stockinette pattern.
Cast-On Over Two Needles
I prefer to cast
on using two needles so that the first row is loose and easy to work.
If I need a tight cast-on edge I can use one needle, but there are
rare occasions when I use one. Nothing will put me off knitting
faster than a tight first row of 50 stitches or more. My first time
using a cable needle I cast-on over 100 stitches and became extremely
frustrated knitting the first row. Since then, I cast on over
straight needles, two cable needles, or both ends of a single cable
needle. It just makes life easier.
Please share your
feedback if you have a different preferred cast-on or a better way to
estimate tail length.
Wednesday, April 23, 2014
Book Recommendation: Knitting Over the Edge
Yesterday I mentioned a book that
pulled me from my knitting rut. I had passed it several times at my
local book store and always made a mental note to check it out next
time. I wonder where my knitting would be today if I looked at the
book years ago. I was very fortunate that this book was at the
library at the right time.
The reason Knitting Over the Edge by Nicky Epstein appeals to me is that it has techniques that give
knitwear a polished look. A recent project of mine was a baby hat.
The pattern was very basic, so I browsed the book for inspiration and
fell in love with a few of the applique flowers. The flowers were
fast to knit up and enhanced the beauty of an otherwise simple hat.
I have to admit that appliques and
cords were my favorite part of the book. I like having them as fast
take-along projects and their uses are endless. One of the appliques
in the book struck me with a pattern idea that I will show in a
future post. Sometimes just the color choices will light up my brain
with a completely new design. This is not the book for you if you
want a lot of words and explanations. There are pictures of every
design and patterns are often in chart form. Stitch counts are given
so that you can work the designs into your own patterns.
If you have not purchased the book
already, it is worth at least trying to find it at your local library.
This has become a permanent member of my knitting library.
Tuesday, April 22, 2014
Welcome!
Welcome to Southern MaMa's Knits. Ten
years ago, my high school psychology teacher taught me to knit.
Hooked instantly, I spent most of my free time knitting as many
things as my parents' budget allowed. My enjoyment gradually faded as
I ran out of useful projects. You probably wonder how I could run out
of projects. It wasn't that difficult. I don't wear knitted clothing
at all, so I was left with a few accessories, home décor items, and
gifts. My interest quickly faded as life got busy.
I didn't pick up needles again until
three years ago when I was pregnant with my son. Knitting him a baby
blanket brought back a little of my knitting joy, but a passion
wasn't sparked. That didn't come until recently when I knit a baby
blanket for a pregnant friend. I went to the library and checked out
as many knitting books as I could find.
In the end, I went with a pattern by
Lion Brand, but one library book made me feel like a beginner again.
My mind started firing off with new designs and inspiration. I have
been knitting daily since I read that book and I am not bored yet. I
decided to document my knitting adventures to help others avoid
falling into a knitting rut.
I would like this to become a community
so, please share your thoughts! Have you ever had to pull yourself
out of a knitting rut?
Subscribe to:
Posts (Atom)